Creating a simple MSI setup is easier with WiX Toolset if you just need a simple file copy style installation of your Windows-based application. MSI setup is referred to Windows Installer (.msi file). In this guide, I have been using WiX Toolset Compiler v3.11.1.2318.
Getting started
To get started, you will need a Product element and this is the primary structure of your WiX project:
<?xml version="1.0" encoding="UTF-8"?>
<Wix xmlns="http://schemas.microsoft.com/wix/2006/wi">

    <!-- We'll include some preprocessor variables here -->

    <Product>
        <!-- Anything goes here will define the design of our setup -->
    </Product>

</Wix>
Let’s add some preprocessor variables and <Product> attributes:
<?xml version="1.0" encoding="UTF-8"?>
<Wix xmlns="http://schemas.microsoft.com/wix/2006/wi">

    <?define MyProductName = "ExampleApp" ?>
    <?define MyProductVersion = "1.0.0" ?>
    <?define MyProductCode = "*" ?>
    <?define MyUpgradeCode = "DA3EEBC7-5812-4380-BDAE-1605417230CB" ?>
    <?define ManufacturerName = "Heiswayi Nrird" ?>
    <?define ProductDescription = "Simplest MSI setup" ?>
    <?define ProductCopyright = "(c) 2018 $(var.ManufacturerName)" ?>
    <?define MainProgramFileFullname = "ExampleApp.exe" ?>
    <?define GuidProgramShortcut = "9ACF08F5-CFF4-43C1-84F9-418ADAAD772D" ?>
    <?define GuidProgramShortcut64 = "CEA4CD03-0819-4A30-903A-22E09B254F04" ?>

    <Product Id="$(var.MyProductCode)"
             Name="$(var.MyProductName)"
             Language="1033"
             Version="$(var.MyProductVersion)"
             Manufacturer="$(var.ManufacturerName)"
             UpgradeCode="$(var.MyUpgradeCode)">
        <!-- Anything goes here will define the design of our setup -->
    </Product>

</Wix>
Now, let’s define MSI setup <Package> and <MediaTemplate> into <Product>:
<?xml version="1.0" encoding="UTF-8"?>
<Wix xmlns="http://schemas.microsoft.com/wix/2006/wi">

    <?define MyProductName = "ExampleApp" ?>
    <?define MyProductVersion = "1.0.0" ?>
    <?define MyProductCode = "*" ?>
    <?define MyUpgradeCode = "DA3EEBC7-5812-4380-BDAE-1605417230CB" ?>
    <?define ManufacturerName = "Heiswayi Nrird" ?>
    <?define ProductDescription = "Simplest MSI setup" ?>
    <?define ProductCopyright = "(c) 2018 $(var.ManufacturerName)" ?>
    <?define MainProgramFileFullname = "ExampleApp.exe" ?>
    <?define GuidProgramShortcut = "9ACF08F5-CFF4-43C1-84F9-418ADAAD772D" ?>
    <?define GuidProgramShortcut64 = "CEA4CD03-0819-4A30-903A-22E09B254F04" ?>

    <Product Id="$(var.MyProductCode)"
             Name="$(var.MyProductName)"
             Language="1033"
             Version="$(var.MyProductVersion)"
             Manufacturer="$(var.ManufacturerName)"
             UpgradeCode="$(var.MyUpgradeCode)">

        <Package Compressed="yes"
                 InstallScope="perMachine"
                 Manufacturer="$(var.ManufacturerName)"
                 Description="$(var.ProductDescription)"
                 Comments="$(var.ProductCopyright)" />

        <MediaTemplate EmbedCab="yes" />

    </Product>

</Wix>
How to implement a Major Upgrade in your setup
When creating a MSI installer, you are strongly encouraged to include logic that supports Windows Installer major upgrades. Major upgrades are the most common form of updates for .msi file, and including this support in your initial .msi release gives you flexibility in the future. Without including the support for major upgrades, you will risk greatly complicating your distribution story if you ever need to release updates later on.
The steps you need to do:
- You will need to set
Id="*"(auto-generate) and defineUpgradeCode="<GUID>"in your<Product>attributes. - Add Upgrade element into your
<Product>element. - Then, schedule the removal of older version in InstallExecuteSequence element.
<?xml version="1.0" encoding="UTF-8"?>
<Wix xmlns="http://schemas.microsoft.com/wix/2006/wi">

    <!-- List of preprocessor variables -->

    <Product Id="$(var.MyProductCode)"
             Name="$(var.MyProductName)"
             Language="1033"
             Version="$(var.MyProductVersion)"
             Manufacturer="$(var.ManufacturerName)"
             UpgradeCode="$(var.MyUpgradeCode)">
        <Package Compressed="yes"
                 InstallScope="perMachine"
                 Manufacturer="$(var.ManufacturerName)"
                 Description="$(var.ProductDescription)"
                 Comments="$(var.ProductCopyright)" />
        <MediaTemplate EmbedCab="yes" />

        <!-- //Implement a Major Upgrade -->
        <Upgrade Id="$(var.MyUpgradeCode)">
            <UpgradeVersion Minimum="$(var.MyProductVersion)" OnlyDetect="yes" IncludeMinimum="yes" Property="DOWNGRADE_DETECTED" />
            <UpgradeVersion IncludeMinimum="no" Maximum="$(var.MyProductVersion)" IncludeMaximum="no" MigrateFeatures="yes" Property="UPGRADE_DETECTED" />
        </Upgrade>
        <InstallExecuteSequence>
            <RemoveExistingProducts After="InstallInitialize" />
        </InstallExecuteSequence>
        <Condition Message="A later version of [ProductName] is already installed. Setup will now exit.">NOT DOWNGRADE_DETECTED</Condition>

    </Product>

</Wix>
How to install program files and create shortcuts
There are few things you need to do here for installing files and shortcuts:
- You need to create a target directory using Directory element.
- You need to create a reference to a particular target directory using DirectoryRef element.
- For each reference, you need to create one or more components using Component elements.
- You need to create one or more features using Feature element and associates particular components into a particular feature.
Source of file(s) to be installed:
--> "<WIX_PROJECT_DIR>\bin\ExampleApp.exe"

Installation target directory:
--> "C:\Program Files (x86)\Heiswayi Nrird\ExampleApp"

Application shortcuts to be created:
--> "Start Menu\ExampleApp\ExampleApp" (to launch ExampleApp.exe)
--> "Start Menu\ExampleApp\Uninstall ExampleApp" (to uninstall ExampleApp)
Target directories for the program files and shortcuts
<Directory Id="TARGETDIR" Name="SourceDir">
    <Directory Id="ProgramFilesFolder">
        <Directory Id="MyProgramFiles" Name="$(var.ManufacturerName)">
            <Directory Id="APPLICATIONFOLDER" Name="$(var.MyProductName)"></Directory>
        </Directory>
        <Directory Id="ProgramMenuFolder" Name="$(var.ManufacturerName)">
            <Directory Id="ApplicationShortcutFolder" Name="$(var.MyProductName)"></Directory>
        </Directory>
    </Directory>
</Directory>
A directory reference for the shortcuts
<DirectoryRef Id="ApplicationShortcutFolder">
    <!-- Component(s) will be here -->
</DirectoryRef>
Note: A directory reference for the program file(s) will be automatically generated using Fragment element.
Components for shortcuts
You may have two components for the shortcuts; one if Windows architecture is 32-bit, another one if 64-bit. The reason for this is that the location of msiexec.exe might be located in different system folder since you have a shortcut to uninstall the program using msiexec.exe. Only one of these two components will be used and it’s based on Condition element defined value in each component.
<DirectoryRef Id="ApplicationProgramsFolder">
    <Component Id="APPSHORTCUT64_comp" Guid="$(var.GuidProgramShortcut)">
        <Condition>VersionNT64</Condition>
        <Shortcut Id="ApplicationStartMenuShortcut" Name="$(var.MyProductName)" Description="$(var.ProductDescription)" Target="[APPLICATIONFOLDER]$(var.MainProgramFileFullname)" WorkingDirectory="APPLICATIONROOTDIRECTORY"/>
        <Shortcut Id="UninstallAppShortcut" Name="Uninstall $(var.MyProductName)" Target="[System64Folder]msiexec.exe" Arguments="/x [ProductCode]"/>
        <RemoveFolder Id="CleanUpShortCut" Directory="ApplicationProgramsFolder" On="uninstall"/>
        <RegistryValue Root="HKCU" Key="Software\$(var.ManufacturerName)\$(var.MyProductName)" Name="installed" Type="integer" Value="1" KeyPath="yes" />
    </Component>
    <Component Id="APPSHORTCUT_comp" Guid="$(var.GuidProgramShortcut)">
        <Condition>NOT VersionNT64</Condition>
        <Shortcut Id="ApplicationStartMenuShortcut" Name="$(var.MyProductName)" Description="$(var.ProductDescription)" Target="[APPLICATIONFOLDER]$(var.MainProgramFileFullname)" WorkingDirectory="APPLICATIONROOTDIRECTORY"/>
        <Shortcut Id="UninstallAppShortcut" Name="Uninstall $(var.MyProductName)" Target="[SystemFolder]msiexec.exe" Arguments="/x [ProductCode]"/>
        <RemoveFolder Id="CleanUpShortCut" Directory="ApplicationProgramsFolder" On="uninstall"/>
        <RegistryValue Root="HKCU" Key="Software\$(var.ManufacturerName)\$(var.MyProductName)" Name="installed" Type="integer" Value="1" KeyPath="yes" />
    </Component>
</DirectoryRef>
Note: Components for the program file(s) will be automatically generated using Fragment element.
Features for the program files and shortcuts
<Feature Id="ProgramFeature" Title="Program Files" Level="1">
    <ComponentGroupRef Id="APPLICATIONFOLDER_comp" />
</Feature>

<Feature Id="ShortcutFeature" Title="Shortcuts" Level="1">
    <ComponentRef Id="APPSHORTCUT64_comp" />
    <ComponentRef Id="APPSHORTCUT_comp" />
</Feature>
How to generate component automatically for each file to be installed
Instead of manually creating the component one-by-one for each of the program files, you can use heat.exe tool along with candle.exe tool from WiX toolset to automatically harvest the program files and creates each component automatically.
Example commands:
"%WIX%bin\heat.exe" dir "bin" -cg APPLICATIONFOLDER_comp -gg -scom -sreg -sfrag -srd -dr APPLICATIONFOLDER -var var.ProjectDir -out "Product.Files.wxs"
"%WIX%bin\candle.exe" "Product.Files.wxs" -out "_Product.Files.wixobj" -dProjectDir=".\bin"
Those commands above will generate two files; Product.Files.wxs and _Product.Files.wixobj. Here is the content of Product.Files.wxs file:
<?xml version="1.0" encoding="utf-8"?>
<Wix xmlns="http://schemas.microsoft.com/wix/2006/wi">
    <Fragment>
        <DirectoryRef Id="APPLICATIONFOLDER">
            <Component Id="cmp40DD4A73DF828C932073F22AA254E961" Guid="{746B1D16-E4BD-421B-BEAA-1F290EBB4276}">
                <File Id="fil3BA6726ABBBBF1BB587CA7587F5F7FA8" KeyPath="yes" Source="$(var.ProjectDir)\ExampleApp.exe" />
            </Component>
        </DirectoryRef>
    </Fragment>
    <Fragment>
        <ComponentGroup Id="APPLICATIONFOLDER_comp">
            <ComponentRef Id="cmp40DD4A73DF828C932073F22AA254E961" />
        </ComponentGroup>
    </Fragment>
</Wix>
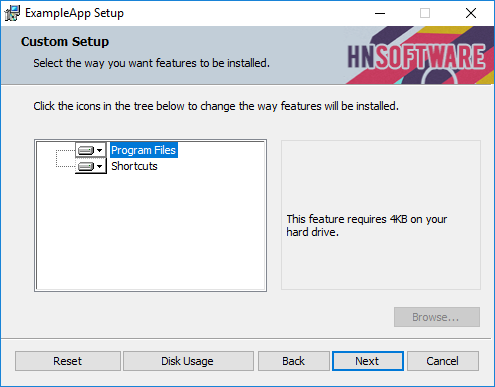
Using built-in WixUI dialog sets
Since you have two features defined, and you may want to let the user to choose which feature they want to install. So, the simplest and best suited dialog set is WixUI_FeatureTree.
<?xml version="1.0" encoding="UTF-8"?>
<Wix xmlns="http://schemas.microsoft.com/wix/2006/wi">

    <!-- List of preprocessor variables -->

    <Product Id="$(var.MyProductCode)"
             Name="$(var.MyProductName)"
             Language="1033"
             Version="$(var.MyProductVersion)"
             Manufacturer="$(var.ManufacturerName)"
             UpgradeCode="$(var.MyUpgradeCode)">
        <Package Compressed="yes"
                 InstallScope="perMachine"
                 Manufacturer="$(var.ManufacturerName)"
                 Description="$(var.ProductDescription)"
                 Comments="$(var.ProductCopyright)" />
        <MediaTemplate EmbedCab="yes" />

        <!-- Implemention of Major Upgrade here -->

        <!-- Installation of files and shortcuts here -->

        <UIRef Id="WixUI_FeatureTree"/>

    </Product>

</Wix>
Add your own installer graphics and icon
If you want to customize your MSI setup graphics instead of using the default reddish WiX graphics, you can add these two WiX variables under your <Product> element. Assuming all of your resource files are located under <WIX_PROJECT_DIR>\res folder. To get the dimension for WixUIBannerBmp and WixUIDialogBmp, you can check WixUI customizations here.
<WixVariable Id="WixUIBannerBmp" Value="res\banner.bmp" />
<WixVariable Id="WixUIDialogBmp" Value="res\dialog.bmp" />
Here’s the XML for the MSI setup icon, similarly it goes under your <Product> element:
<Icon Id="icon.ico" SourceFile="res\appIcon.ico"/>
<Property Id="ARPPRODUCTICON" Value="icon.ico" />
Define your own license file
When you use the built-in WixUI dialog set, you may need to define your license file. Just get your License.rtf ready and add this under your <Product> element. Assuming your license file is located under <WIX_PROJECT_DIR>\doc folder.
<WixVariable Id="WixUILicenseRtf" Value="doc\License.rtf" />
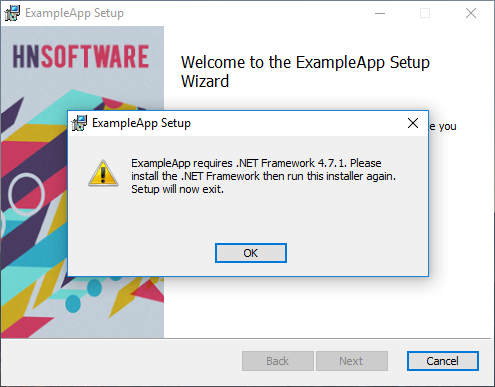
How to detect a required minimum version of .NET Framework (optional)
If your program requires a certain minimum version of .NET Framework needs to be installed in order to work, you can include a detection using <Condition> element to check and then inform the user if they need a particular version of .NET Framework to be installed before they can install and use your program files. Let’s say your program requires .NET Framework 4.7.1, here what you need to do:
First, you need to include a reference xmlns:netfx="... into your WiX file:
<?xml version="1.0" encoding="UTF-8"?>
<Wix xmlns="http://schemas.microsoft.com/wix/2006/wi"
     xmlns:netfx="http://schemas.microsoft.com/wix/NetFxExtension">

    <Product>
        <!-- Your MSI setup design here -->
    </Product>

</Wix>
And then, include this Condition under your <Product> element:
<PropertyRef Id="NETFRAMEWORK45" />
<Condition Message="[ProductName] requires .NET Framework 4.7.1. Please install the .NET Framework then run this installer again. Setup will now exit.">
    <![CDATA[Installed OR (NETFRAMEWORK45 AND NETFRAMEWORK45 >= "#461308")]]>
</Condition>
Please note that
#461308represents a .NET Framework version for 4.7.1. You can check here for more details about .NET Framework versions.
Creating a batch script to build your MSI setup
I’m using a batch scripting and these are the commands I use to build my MSI setup output:
@echo off
set projectDir=.\bin

rem Automatically harvest program files and create each component
"%WIX%bin\heat.exe" dir "bin" -cg APPLICATIONFOLDER_comp -gg -scom -sreg -sfrag -srd -dr APPLICATIONFOLDER -var var.ProjectDir -out "Product.Files.wxs"
"%WIX%bin\candle.exe" "Product.Files.wxs" -out "_Product.Files.wixobj" -dProjectDir="%projectDir%"

rem Compile and create mySetup.msi
"%WIX%bin\candle.exe" "Product.wxs" -out "_Product.wixobj" -nologo
"%WIX%bin\light.exe" "_Product.Files.wixobj" "_Product.wixobj" -cultures:en-US -ext WixUIExtension -ext WixNetFxExtension -out "mySetup.msi" -nologo
Please note that if you’re using built-in WixUI dialog set, you may need to include
-cultures:en-US -ext WixUIExtensioninto yourlight.execommands as shown above. For .NET Framework detection, you may need to append-ext WixNetFxExtensioninto the commands.
Example of a full complete WiX script
File name: Product.wxs
<?xml version="1.0" encoding="UTF-8"?>
<Wix xmlns="http://schemas.microsoft.com/wix/2006/wi" xmlns:netfx="http://schemas.microsoft.com/wix/NetFxExtension">
    <?define MyProductName = "ExampleApp" ?>
    <?define MyProductVersion = "2.0.0" ?>
    <?define MyProductCode = "*" ?>
    <?define MyUpgradeCode = "DA3EEBC7-5812-4380-BDAE-1605417230CB" ?>
    <?define ManufacturerName = "Heiswayi Nrird" ?>
    <?define ProductDescription = "Demo installer for WiX basics" ?>
    <?define ProductCopyright = "(c) 2018 $(var.ManufacturerName)" ?>
    <?define MainProgramFileFullname = "ExampleApp.exe" ?>
    <?define GuidProgramShortcut = "9ACF08F5-CFF4-43C1-84F9-418ADAAD772D" ?>
    <?define GuidProgramShortcut64 = "CEA4CD03-0819-4A30-903A-22E09B254F04" ?>
    <?define LicenseEulaFile = "License.rtf" ?>
    <?define BannerBmp = "banner.bmp" ?>
    <?define DialogBmp = "dialog.bmp" ?>
    <?define AppIcon = "appIcon.ico" ?>

    <Product Id="$(var.MyProductCode)" Name="$(var.MyProductName)" Language="1033" Version="$(var.MyProductVersion)" Manufacturer="$(var.ManufacturerName)" UpgradeCode="$(var.MyUpgradeCode)">
        <Package Compressed="yes" InstallScope="perMachine" Manufacturer="$(var.ManufacturerName)" Description="$(var.ProductDescription)" Comments="$(var.ProductCopyright)" />
        <MediaTemplate EmbedCab="yes" />

        <WixVariable Id="WixUILicenseRtf" Value="$(var.LicenseEulaFile)" />
        <WixVariable Id="WixUIBannerBmp" Value="$(var.BannerBmp)" />
        <WixVariable Id="WixUIDialogBmp" Value="$(var.DialogBmp)" />

        <Icon Id="icon.ico" SourceFile="$(var.AppIcon)"/>
        <Property Id="ARPPRODUCTICON" Value="icon.ico" />

        <Upgrade Id="$(var.MyUpgradeCode)">
            <UpgradeVersion Minimum="$(var.MyProductVersion)" OnlyDetect="yes" IncludeMinimum="yes" Property="DOWNGRADE_DETECTED" />
            <UpgradeVersion IncludeMinimum="no" Maximum="$(var.MyProductVersion)" IncludeMaximum="no" MigrateFeatures="yes" Property="UPGRADE_DETECTED" />
        </Upgrade>
        <InstallExecuteSequence>
            <RemoveExistingProducts After="InstallInitialize" />
        </InstallExecuteSequence>
        <Condition Message="A later version of [ProductName] is already installed. Setup will now exit.">NOT DOWNGRADE_DETECTED</Condition>

        <PropertyRef Id="NETFRAMEWORK45" />
        <Condition Message="[ProductName] requires .NET Framework 4.7.1. Please install the .NET Framework then run this installer again. Setup will now exit.">
            <![CDATA[Installed OR (NETFRAMEWORK45 AND NETFRAMEWORK45 >= "#461308")]]>
        </Condition>

        <Directory Id="TARGETDIR" Name="SourceDir">
            <Directory Id="ProgramFilesFolder">
                <Directory Id="MyProgramFiles" Name="$(var.ManufacturerName)">
                    <Directory Id="APPLICATIONFOLDER" Name="$(var.MyProductName)"></Directory>
                </Directory>
                <Directory Id="ProgramMenuFolder" Name="$(var.ManufacturerName)">
                    <Directory Id="ApplicationShortcutFolder" Name="$(var.MyProductName)"></Directory>
                </Directory>
            </Directory>
        </Directory>

        <DirectoryRef Id="ApplicationShortcutFolder">
            <Component Id="APPSHORTCUT64_comp" Guid="$(var.GuidProgramShortcut64)">
                <Condition>VersionNT64</Condition>
                <Shortcut Id="ApplicationStartMenuShortcut64" Name="$(var.MyProductName)" Description="$(var.ProductDescription)" Target="[APPLICATIONFOLDER]$(var.MainProgramFileFullname)" WorkingDirectory="APPLICATIONROOTDIRECTORY"/>
                <Shortcut Id="UninstallAppShortcut64" Name="Uninstall $(var.MyProductName)" Target="[System64Folder]msiexec.exe" Arguments="/x [ProductCode]"/>
                <RemoveFolder Id="CleanUpShortCut64" Directory="ApplicationShortcutFolder" On="uninstall"/>
                <RegistryValue Root="HKCU" Key="Software\$(var.ManufacturerName)\$(var.MyProductName)" Name="installed" Type="integer" Value="1" KeyPath="yes" />
            </Component>
            <Component Id="APPSHORTCUT_comp" Guid="$(var.GuidProgramShortcut)">
                <Condition>NOT VersionNT64</Condition>
                <Shortcut Id="ApplicationStartMenuShortcut" Name="$(var.MyProductName)" Description="$(var.ProductDescription)" Target="[APPLICATIONFOLDER]$(var.MainProgramFileFullname)" WorkingDirectory="APPLICATIONROOTDIRECTORY"/>
                <Shortcut Id="UninstallAppShortcut" Name="Uninstall $(var.MyProductName)" Target="[SystemFolder]msiexec.exe" Arguments="/x [ProductCode]"/>
                <RemoveFolder Id="CleanUpShortCut" Directory="ApplicationShortcutFolder" On="uninstall"/>
                <RegistryValue Root="HKCU" Key="Software\$(var.ManufacturerName)\$(var.MyProductName)" Name="installed" Type="integer" Value="1" KeyPath="yes" />
            </Component>
        </DirectoryRef>

        <Feature Id="ProgramFeature" Title="Program Files" Level="1">
            <ComponentGroupRef Id="APPLICATIONFOLDER_comp" />
        </Feature>
        <Feature Id="ShortcutFeature" Title="Shortcuts" Level="1">
            <ComponentRef Id="APPSHORTCUT64_comp" />
            <ComponentRef Id="APPSHORTCUT_comp" />
        </Feature>

        <UIRef Id="WixUI_FeatureTree"/>
    </Product>
</Wix>