Introduction to Keycloak
Keycloak is a powerful solution designed for user identity and access management. It’s an open-source software that allows for self-hosting, making the process of securing applications and services hassle-free. With Keycloak, you can avoid the complexities of user storage and authentication, as everything comes ready out of the box. Let’s explore the notable features Keycloak offers:
- Single Sign-On (SSO) and Single Logout
- Support for Standard Protocols - e.g. OpenID Connect (OIDC), OAuth 2.0, and SAML 2.0
- Flexible Authentication and Authorization
- Multi-Factor Authentication (MFA) - e.g. One-time Password (OTP)
- Social Logins - e.g. Google, Facebook, Twitter, etc.
- Centralized User Management
- Support for Directory Services - e.g. LDAP, Active Directory
- Customizable and Extensible
- Easy Setup and Integration using provided client adapters
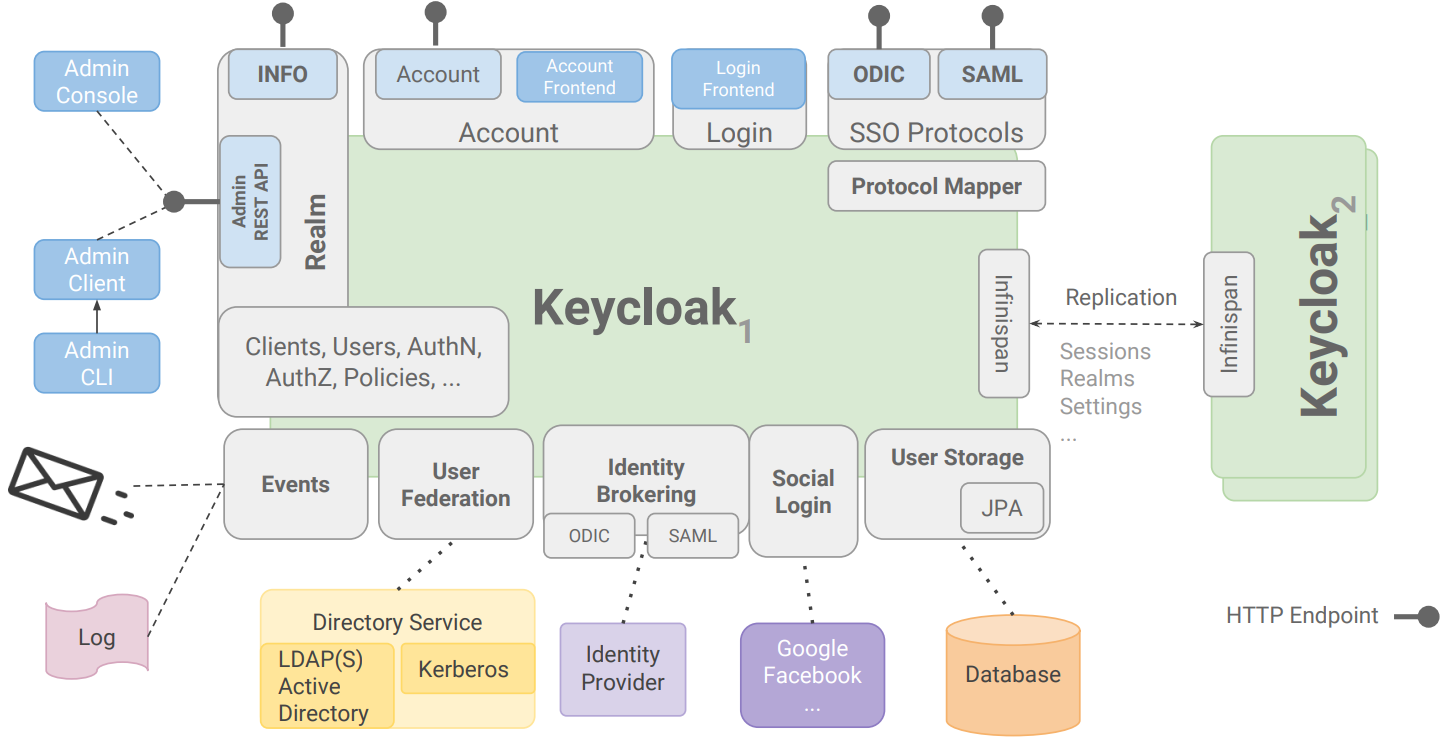
Keycloak core concepts and architecture
Keycloak operates within a realm, a namespace where you manage metadata and configurations. The default realm, master, is reserved for Keycloak management and should not be used for your applications. Key components managed within a realm include:
- Clients
- Roles
- Identity Providers (OIDC 1.0, Keycloak OIDC, SAML 2.0, Social Logins)
- User Federation (Kerberos, LDAP)
- Authentication configurations
- User Management (Groups, Users)
- UI Themes
- Realm settings
The architecture of Keycloak is illustrated below:
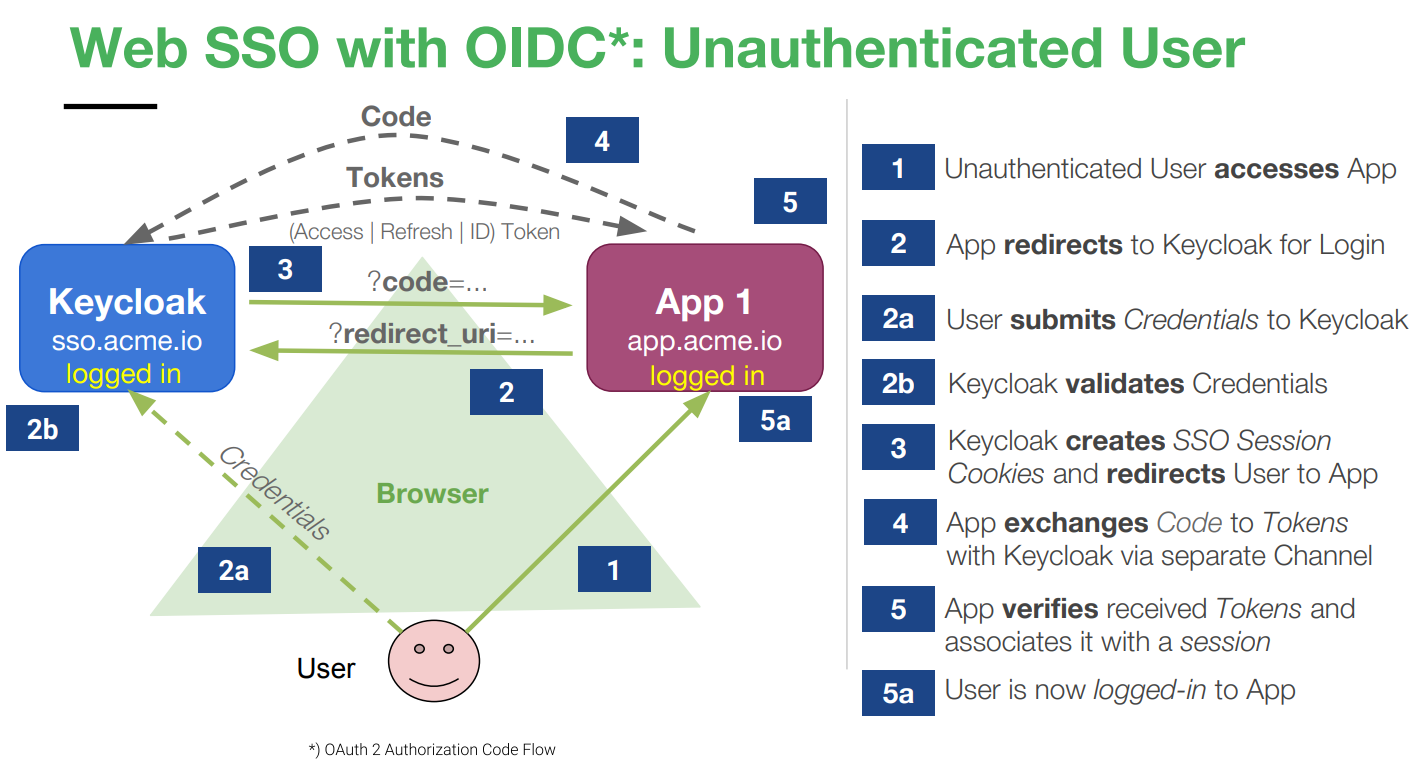
User authentication using Keycloak
Keycloak as Identity Provider (IdP) to frontend application
User authentication when accessing a frontend application is depicted in the following image:
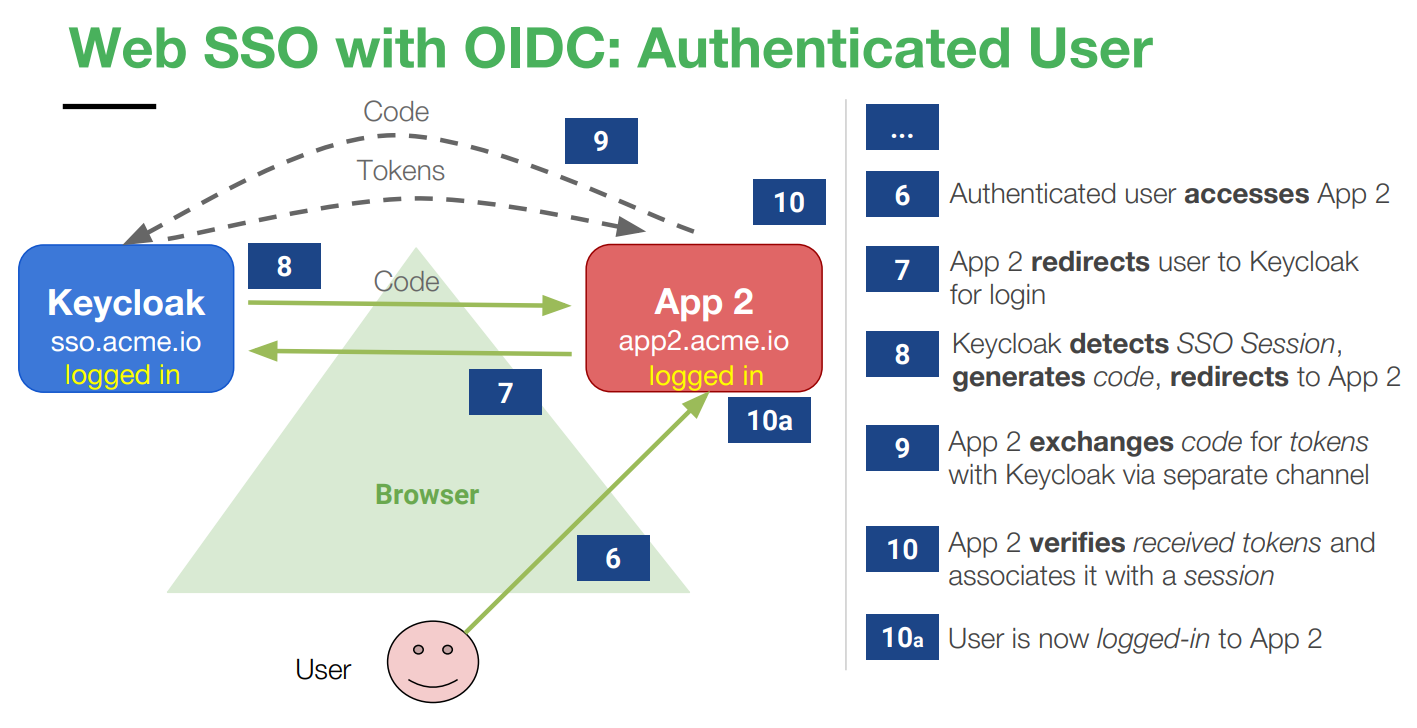
Single Sign-On (SSO) integration
Keycloak supports Web SSO, enabling users to log in once to access all applications. It also facilitates single logout across various platforms, including web, mobile, and desktop applications. The authentication flow for a logged-in user accessing another frontend application is illustrated below:
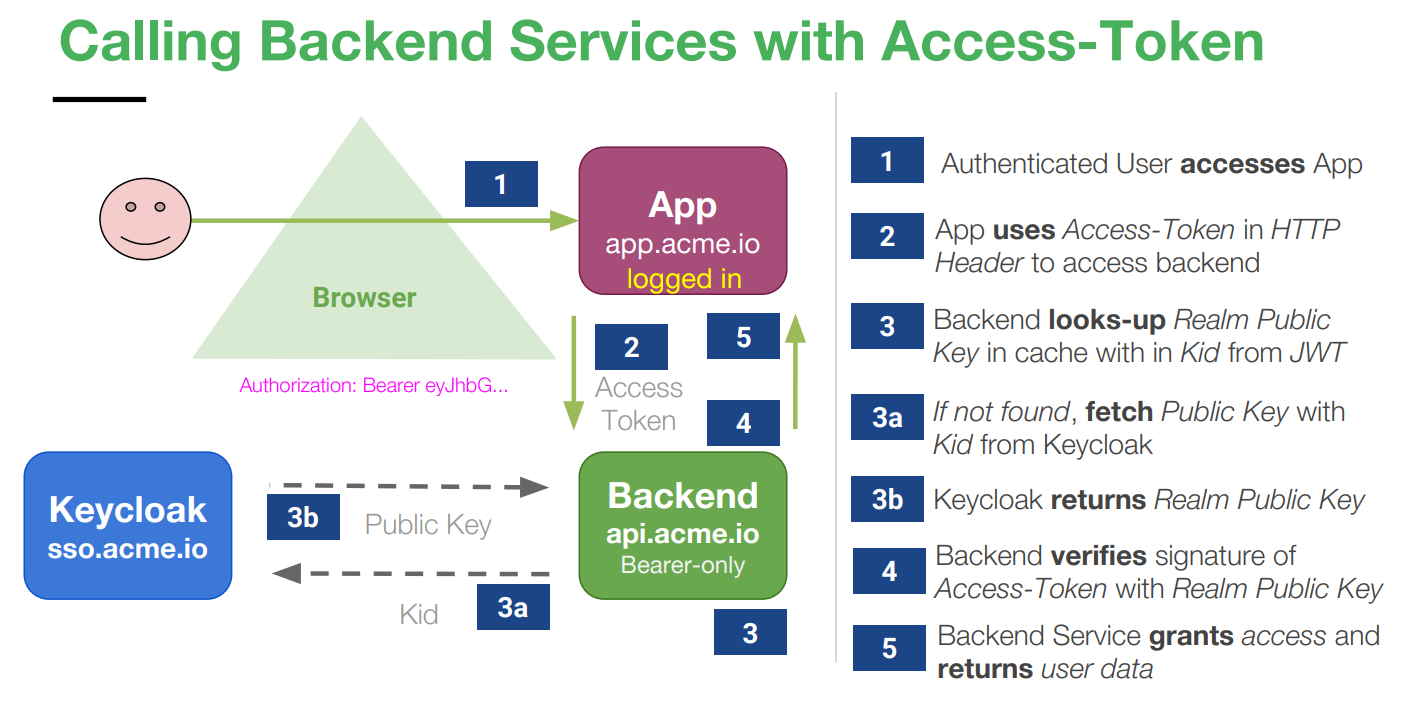
How backend services work with Keycloak
The flow of how backend services interact with Keycloak to validate access tokens is outlined in the following image:
Understanding Keycloak tokens
Keycloak operates based on tokens, especially for OAuth2 and OIDC protocols. Key points about Keycloak tokens:
- A token is a signed self-contained JSON Web Token (JWT).
- It contains claims holding metadata and user information.
- Issued by Keycloak and signed with a realm private key.
- Verified using the realm public key.
- Has a limited lifespan and is revokable.
Types of tokens when authenticating with Keycloak:
| Access token | Short-lived (minutes), used for accessing resources. |
| Refresh token | Long-lived (days), used for requesting new tokens. |
| Offline token | A special refresh token that “never” expires. |
| ID token | Contains information about the user (used by OIDC). |
Example screenshots of Keycloak UI
Keycloak Admin Console:

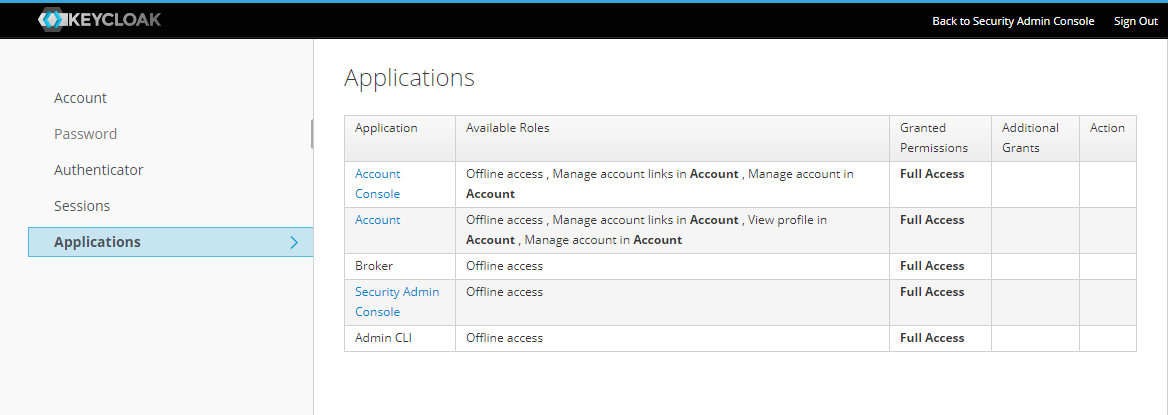
Keycloak User Account Console:
Keycloak Admin REST API examples
Here are some common Keycloak Admin REST API examples for application management. Refer to the Keycloak Admin REST API documentation page for more details.
Authenticate as Keycloak Admin
curl --location --request POST '<KEYCLOAK_SERVER>/auth/realms/master/protocol/openid-connect/token' \
--header 'Content-Type: application/x-www-form-urlencoded' \
--data-urlencode 'grant_type=password' \
--data-urlencode 'username=<KEYCLOAK_ADMIN_USER>' \
--data-urlencode 'password=<KEYCLOAK_ADMIN_PASS>' \
--data-urlencode 'client_id=admin-cli'
Get user list executed from a specific user account
Following are the prerequisite steps that needed to be applied on Keycloak Admin Console:
- From a selected realm, go to Manage ⟶ Users.
- To apply for a specific user, click on “View all users” button then click on selected user ID.
- Go to Role Mappings tab, select
realm-managementfrom the Client Roles. - Scroll down in Available Roles, find
view-usersand add it into Assigned Roles.
Alternatively, this can be applied as a default value for all newly registered users;
- From a selected realm, go to Manage ⟶ Roles.
- Select
realm-managementfrom the Client Roles. - Scroll down in Available Roles, find
view-usersand add it into Client Default Roles.
Get the access token:
curl --location --request POST '<KEYCLOAK_SERVER>/auth/realms/<REALM>/protocol/openid-connect/token' \
--header 'Content-Type: application/x-www-form-urlencoded' \
--data-urlencode 'grant_type=password' \
--data-urlencode 'username=<USERNAME>' \
--data-urlencode 'password=<PASSWORD>' \
--data-urlencode 'client_id=<CLIENT_ID>' \
--data-urlencode 'client_secret=<CLIENT_SECRET>'
Use the access token to get the user list:
curl --location --request GET '<KEYCLOAK_SERVER>/auth/admin/realms/<REALM>/users' \
--header 'Authorization: Bearer <ACCESS_TOKEN>'
Get a specific user info
Get the access token:
curl --location --request POST '<KEYCLOAK_SERVER>/auth/realms/<REALM>/protocol/openid-connect/token' \
--header 'Content-Type: application/x-www-form-urlencoded' \
--data-urlencode 'grant_type=password' \
--data-urlencode 'username=<USERNAME>' \
--data-urlencode 'password=<PASSWORD>' \
--data-urlencode 'client_id=<CLIENT_ID>' \
--data-urlencode 'client_secret=<CLIENT_SECRET>'
Grab the user ID and use it to get the respective user info:
curl --location --request GET 'https://<KEYCLOAK_SERVER>/auth/admin/realms/<REALM>/users/<USER_ID>' \
--header 'Authorization: Bearer <ACCESS_TOKEN>'
Get user roles from a specific user
Get the access token:
curl --location --request POST '<KEYCLOAK_SERVER>/auth/realms/<REALM>/protocol/openid-connect/token' \
--header 'Content-Type: application/x-www-form-urlencoded' \
--data-urlencode 'grant_type=password' \
--data-urlencode 'username=<USERNAME>' \
--data-urlencode 'password=<PASSWORD>' \
--data-urlencode 'client_id=<CLIENT_ID>' \
--data-urlencode 'client_secret=<CLIENT_SECRET>'
Grab the user ID and use it get the user roles:
curl --location --request GET '<KEYCLOAK_SERVER>/auth/admin/realms/<REALM>/users/<USER_ID>/role-mappings' \
--header 'Authorization: Bearer <ACCESS_TOKEN>'
Quick deployment of Keycloak via Docker Compose
Here’s an example of a docker-compose.yml file for a quick Keycloak deployment using Docker Compose:
version: '3.5'

volumes:
  pgkeycloak-data:
    name: acme_pgkeycloak-data

networks:
  acme:
    driver: bridge
    name: acme_network

services:

  pgkeycloak:
    image: postgres:12-alpine
    container_name: keycloak_database
    volumes:
      - pgkeycloak-data:/var/lib/postgresql/data
    environment:
      POSTGRES_DB: keycloak
      POSTGRES_USER: keycloakdb
      POSTGRES_PASSWORD: ${KEYCLOAK_DB_PASSWORD}
    ports:
      - "5432:5432"
    networks:
      - acme

  keycloak:
    container_name: keycloak_service
    image: keycloak:latest
    environment:
      KEYCLOAK_USER: ${KEYCLOAK_ADMIN_USER}
      KEYCLOAK_PASSWORD: ${KEYCLOAK_ADMIN_PASS}
      PROXY_ADDRESS_FORWARDING: "true"
      DB_USER: keycloakdb
      DB_PASSWORD: ${KEYCLOAK_DB_PASSWORD}
      DB_DATABASE: keycloak
      DB_ADDR: pgkeycloak
      DB_VENDOR: postgres
      DB_SCHEMA: public
    ports:
      - "8080:8080"
      - "8443:8443"
    networks:
      - acme
    depends_on:
      - pgkeycloak
You can use following docker-compose CLI to get started:
$ docker-compose -f path/to/docker-compose.yml up -d
To learn more about Keycloak, visit its official website.